Thursday, December 14, 2017

Slow Cooker Broccoli Cheese Soup


Did you ever want to make homemade soup but you didn't feel like standing in front of the stove for a long time? That's how I feel all the time. That's why I like to get the slow cooker out and let it do it's thing. 

I also like prep to be as quick as possible (as you know if you have read previous posts), because I always have something else I need to be doing. Especially at this time of year. 

You can put the ingredients in the slow cooker and go about your business for three or four hours before you need to move to the next step. Perfect for getting other things accomplished. 

This soup starts with a few basic ingredients, including one that you most likely reserve for all your queso dip needs.  


Slow Cooker Broccoli Cheese Soup


Slow Cooker Broccoli Cheese Soup

                  Prep time: 15 minutes    Cook time: 3-5 hours

2-4 Cups broccoli, chopped
1 small onion, diced
2 carrots, diced
1 celery stalk, diced
10.5 ounce can Cream of Broccoli soup
10.5 ounce can of Cream of Chicken soup
1- 32 ounce box chicken broth
1 pound Velveeta, cubed
2 cups sharp cheddar cheese, shredded
1 cup milk, half and half, or heavy cream
salt and pepper to taste

The first six ingredients.


Add the first six ingredients to the slow cooker. 

Remember, you are in charge of how much broccoli you want in your soup and how big you want the pieces to be. 

Add the salt and pepper.

Cook on high for 3 to 4 hours. If you are near the slow cooker you can stir it occasionally. 


When the veggies are tender add the cheese and milk.

Stir. Continue to cook on high until cheese is melted. Turn to low until ready to serve.


This soup goes great with your favorite sandwich, salad, or all by itself.


Slow Cooker Broccoli Cheese Soup


Serves: It's hard to tell because my family devours this soup. I'm going to guess that it serves about 6-8, 1 cup servings.

Enjoy!


Until next time!


Wednesday, August 2, 2017

Campfire Banana Packets

In the Spring of this year my husband and I went for a walk around a local state park. While walking around the lake we reminisced about the time we camped there when the kids were young. We were all, "Remember when we camped at that site?", and "That was so much fun." 

That led to one of us deciding we should get the adult children to go camping with us over the summer for old times sake. 

As the decided upon date approached, I couldn't help but wonder what kind of brain cramp I suffered to agree to this trip. Don't get me wrong. I used to enjoy camping but as I eventually moved up to camping in a camper, I couldn't see the appeal of going back to tent camping. 

So I dug out all our old camping gear. I scrubbed, organized, planned and worked my behind off leading up the trip. 

I'm positive that one of the reasons I decided to go camping was the anticipation of having a Campfire Banana Packet.

There are many great duos: Tortilla chips and salsa, chips and dip, tomato soup and grilled cheese, peas and carrots, Forrest and Jenny, but the best is CHOCOLATE and PEANUT BUTTER.   

All turned out well and we had a great time. The Campfire Banana packets were as good as I remembered!


Campfire Banana Packets

Campfire Banana Packets

Prep time: minimal    Cook time: 15-20mins

Ingredients are per packet:
1 banana
2 Tbsps of peanut butter 
about 5 pieces of a Hershey's chocolate bar 
Square of aluminum foil
1 campfire

I have way to many Hershey's bars in this picture for 1 packet. Oops.

With a sharp knife, slice the banana with the peel still on down the center lengthwise. Be careful not to slice all the way through the peel on the bottom of banana.

Evenly spread the peanut butter down the center with the back of a spoon or a butter knife. 

Place the chocolate squares on top of the peanut butter, pushing them down into the center.

Almost ready for the fire.
Make a packet by folding the long sides of the foil up and folding over. Leave some air space so that your chocolate and peanut butter won't stick to the foil.


Place on a rack over the campfire. I check mine after 10 minutes but usually cook it for longer. Cook time depends on size of fire, how close the packet is to the fire and the size of the banana. When everything is nice and melted and the banana is slightly soft it's good to go!

This is why I agreed to go camping. :)

Campfire Banana Packets ready to eat!


If there is a vegan in your life you can just skip the chocolate bar and add some vegan marshmallows.

Shout-out to my mother-in-law for introducing me to this camp snack many years ago. Of course it involves chocolate!

Enjoy!


Until next time!


Thursday, March 2, 2017

Slow Cooker Chicken Fajita Bowls

Slow Cooker Chicken Fajita Bowls


If you're looking for a quick and easy meal to throw in the slow cooker while you're at work, then look no further. This is also great for a busy weekend.

This delicious meal will not only please a crowd, but feed one, too. 

With very little prep work involved, this might just be one of my favorite go-to meals!


Slow Cooker Chicken Fajita Bowls
               Prep time: 10 minutes  Cook time:8-9 hrs on low or
                                                                    4-5 hrs on high

2 pounds boneless, skinless chicken breast, cut into strips
2 green bell peppers, cut in strips
1 large onion, sliced
2 packets of fajita seasoning
15.5 ounce can black beans, drained & rinsed
11 ounce can corn, drained
1 cup salsa
Prepared white or brown rice
Toppings: salsa, tomatoes, shredded cheese, cubed avocado, sour cream, etc.

Slice the onion and cut the green pepper and chicken into strips. Place chicken into the slow cooker. Sprinkle the fajita seasoning over chicken. Pour salsa over the chicken and stir with tongs.
Place onions and peppers over chicken.

Before


Cover and cook on low for 8 to 9 hours or on high for 4 to 5 hours. During the last half hour add the black beans and corn. Stir. If you are cooking on low turn it up to high for this part. 

After


Prepare the white or brown rice. 

Spoon the chicken mixture over the rice.

Top with your favorite toppings from the list above or add your own. 

So Delicious!!! 

Slow Cooker Chicken Fajita Bowls

About 10 servings.

Enjoy!


Until next time!

Monday, January 2, 2017

The Best Pot Roast


Now that I'm old...this is where you say, "OH, you're not old!". Go ahead, I'll wait. Okay, now that that's settled we can continue. Now that some people may be getting older (but not me, remember) they might not enjoy the cold, ice and snow. 

Who wants to deal with that? You have to get all bundled up, shovel the sidewalks and driveway, scrape the car, and deal with people who drive like maniacs as if its sunny and 70º outside. 

No thank you!

The only thing I do enjoy about this kind of weather is having an excuse to stay home and make a good old fashioned, stick to your ribs recipe. 

This is one of them. 

The Best Pot Roast


The Best Pot Roast

Prep time: 10 minutes   Cook time: 3hrs 10mins

3 pound (or as close as you can get) chuck roast
1 pound mushrooms, I prefer baby bella, cut in half
3 carrots, cut into 2 or 3 inch pieces
1 onion, quartered
2 ½ cups beef broth
¾ cup burgundy cooking wine (or just use ¾ cup more of beef broth or water)
2 tbsp Montreal steak seasoning
2 tbsp oil, plus more if needed
2 tsp of chopped fresh thyme and rosemary, 

The Best Pot Roast ingredients


Preheat oven to 275º.
 In a dutch oven, heat the olive oil on medium-high heat. Add the chuck roast. Sprinkle with 1 tablespoon of Montreal steak seasoning. Sear for 2 to 3 minutes. Turn roast over and sprinkle with remaining seasoning. Add more oil if needed. sear for 2 to 3 minutes. continue to sear on all sides for 2 to 3 minutes. You might have to use your tongs to hold the roast up on the narrow sides.

Add all remaining ingredients starting with the liquids and ending with the fresh herbs.

Ready to go into the oven.

Cover and cook for 3 hours. 

So this is where I feel the need to tell you that you do NOT need to take the lid off at any point during the cooking time to take a peek. If you do you'll be sorry. You won't have a fabulous fork-tender roast if you mess with it while it's in the oven. I mean it!

Once you get to the 3 hour mark, take the dutch oven out of the oven and let sit with the lid on for about 10 minutes. Then take the lid off and let it sit for another 10 minutes.

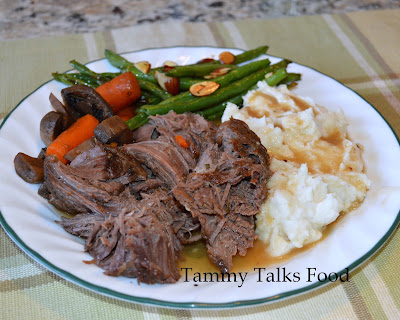
This will give you time to work on your sides. I enjoy my roast with mashed potatoes and oven-roasted green beans. 

Use the pan juices as a gravy for your roast and mashed potatoes if you are serving them with your roast. 

The Best Pot Roast

Tip: If you have a big dutch oven go ahead and add more veggies. Mine is small and I don't want to add too much at one time. I also like another veg on the side.

Serves 6


Enjoy!


Until next time!